
Some Bunny's Carrot Bag
- Rachael Forshaw
- Mar 28
- 5 min read
Updated: May 3


🥕 Introduction
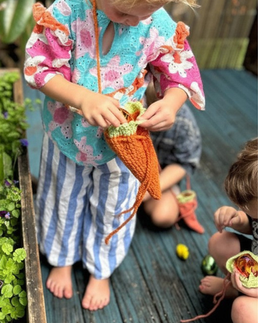
Bring a little Easter magic along on every egg hunt with Some Bunny’s Carrot Bag 🥕✨
This adorable crochet bag is perfect for collecting Easter eggs, treats, and all those tiny treasures that little hands love to carry. Whether you’re making it for an egg hunt, a gift, or just for playtime, this bag adds the sweetest handmade touch 🐰
It’s a fun and relaxing project that works up beautifully, with simple shaping and cute details that bring the carrot to life.
✨ About the Design
This carrot bag is worked as one continuous piece, starting with the base and building up as you go. The strap, leafy top, and drawstring are all added directly onto the bag, making construction simple and seamless.
It’s designed to be both practical and playful, with a roomy interior and a secure drawstring closure—perfect for busy little bunnies on the go 🐣
🧶 Skill Level
This pattern is suitable for beginner crocheters.
You’ll need to be familiar with:
Basic stitches
Working in the round
Simple increases and decreases
🪡 Materials
Yarn (DK, worsted, 8ply, or your preferred weight)
Orange (carrot)
Green (leaves)
4mm hook or hook suitable for your yarn
Tapestry needle
Stitch markers
Scissors
📏 Size
You can easily adjust this pattern to achieve your desired size. You also have the option to add a strap for a small shoulder bag, or simply keep it as a little gift pouch.
If you’re making a bag for egg hunting, my personal preference is to double your yarn or use a bulkier yarn for a sturdier finish. I recommend keeping the same hook size to maintain the strength and structure of the bag.
The bag shown in the pattern is made with a single strand of yarn, giving it a softer, more open look where the contents are slightly visible and the fabric moulds to what’s inside.
a) My sample bag in the pattern uses 13 rows and measures approximately
14 cm / 5.5" long x 10 cm / 4" wide.
b) A second, sturdier version made with doubled yarn and 15 rows (featured in the finished photos) measures approximately 19 cm / 7.5" long x 14 cm / 5.5" wide.
For a larger egg hunting bag, I recommend working at least 20 rows with the yarn doubled.
🪡 Terminology
Written in US crochet terms
Pattern is written in English
Standard abbreviations are used throughout
FO = Fasten off
MR = Magic ring
ch/s = Chain/s
cont = Continue
dc = Double crochet
inc = Make 2 double crochets in 1 stitch
inv = Invisible
rep = Repeat
rnd = Round
sk = Skip
sl st = Slip stitch
st/s = Stitch/es
tog = Together
** = Repeat everything in between
[] = Stitch count - includes chains
💡 Tips Before You Start
Use a stitch marker to keep track of your rounds
Check your gauge if you’d like a specific size
Keep your tension consistent for the best shape
📌 Share Your Makes
I LOVE seeing your creations 🥹
If you make your own carrot bag, don’t forget to tag me on Instagram @byrachforshaw so I can share your work!
💌 Pattern Notes
This is a free crochet pattern for personal use only
Please do not copy, redistribute, or sell this pattern
You are welcome to sell finished items made from this pattern—credit is always appreciated
SOME BUNNY'S CARROT BAG
PART ONE
Carrot


We will work in rnds in a spiral.
1. Orange: In a MR, ch 1 and work 1 sc, 1 hdc, 4 dc. Pull MR closed.
[6]
2. 1 dc, inc x 3.
[9]
3. 1 dc, inc, 1 dc x 3.
[12]
4. Dc x 3, inc x 3.
[15]
5. Dc x 2, inc, dc x 2 x 3.
[18]
6. Dc x 5, inc x 3.
[21]
7. Dc x 3, inc, dc x 3 x 3.
[24]
8. Dc x 7, inc x 3.
[27]
9. Dc x 4, inc, dc x 4 x 3.
[30]
10. Dc x 9, inc x 3.
[33]
11. Dc x 5, inc, dc x 5 x 3.
[36]
12. Dc x 11, inc x 3.
[39]
13.1 Dc x 6, inc, dc x 6 x 3.
[42]
You can cont repeating to make it as large as you’d like. End with the following steps.
13.2 Hdc x 2. Sc x 2. Sl st into next st.
[5]
If you would like a strap for your bag then we can cont on. If not you can FO and sk to
Strap


a. Ch as long as you need to wrap
around the body.
b. Attach the chain to the other side with a sl st. Try not to twist your chain.
c. You may FO and weave in ends, or for
a sturdier chain, sl st back along the ch.
d. FO and weave in end.
PART TWO
Leaves


Tie green onto the loop behind the chain. If you didn’t make a chain then attach to any st.
14.1 Ch 2, then dc into the st that the chain stems from. If you have no chain then you are simply going to dc into every st.
14.2 Dc along and when you reach the other side of the chain, dc in between the loops of the chain to keep it even.
14.3 Dc until you reach the end then sl st into the top of ch 2 to join.
15. Ch 2, then dc in every st. Sl st into the
top of ch 2 to join.
You now have the choice to make one more straight row or a frill.
16. Ch 2, then dc in every st. Cut yarn leaving a small tail and end with an inv join.
Sew tail through first dc of the rnd, then in between the loops of the last dc of the rnd.
Weave in ends.
Picot Frill


16. Ch 3, sl st into the very first ch. Sl st into the next 2 sts on base.* Rep until end. FO.
a. Insert your needle into the centre of the picot.
b. Insert your needle in between the loops of the last st we made.
c. Weave end through.
PART THREE
Drawstring


a. Create a chain to desired length, ensuring it is long enough to tie a bow.
b. Weave drawstring through sts. You may count sts to ensure even spacing as you want both ends to poke out here.
c. You’ll simply jump from the top row to here—it won’t be noticeable once closed.
Fill with goodies, then tie in a bow if giving as a gift.


You're all finished! :-)

Comments